

But what do you do once you discovered this issue? I’ve seen people tackle this problem using a range of options and noticed that just yanking the curves seems to be a popular choice. But the issue I have with this solution is that changing the curves or levels to lower the ink percentages always results in brightening the overall image, which makes sense because you’re just making the shadows visibly lighter. I want to use a solution that will change the total ink percentage without anyone noticing. Here’s a workflow you can use for this.
Step one: locate the problem pixels
When you have your image open inside of Photoshop, your first task is to find where the problem is. You can use a Threshold adjustment layer to quickly pinpoint the darkest areas in your image.
1. Click the adjustment layer icon at the bottom of the layers panel and choose Threshold from the list. This will create a Threshold adjustment layer.


3. In the Tools panel, click and hold the mouse button on the Eyedropper tool to see the hidden tools under it and choose Color Sampler Tool. This tool allows you to place permanent measuring points in your image. With this tool, click on 4 locations in your image to measure the colour values. Once you have your 4 points in place it’s time to remove the Threshold layer.


Step two: measure what you have and get the total ink percentages
When you remove the Threshold adjustment layer you’ll notice that you get the actual CMYK values from your image. The numbers seem to be quite high and it’s a bit tiresome to do the math yourself here and add all these numbers together to get the total amount of ink. When you think there must be an easier way to do something there usually is. Notice the small Eyedropper icon with the tiny black triangle next to your reading in the Info panel? Click it and select Total Ink from the drop down list. Now you have the total ink percentages.
Step three: reducing the ink globally
Now it’s time to really get rid of a few percentages. For this we are going to use the Channel Mixer adjustment layer.
1. Go back to the Layers panel and click the Adjustment icon at the bottom and choose Channel Mixer from the list this time.

2. The Channel Mixer allows you to lower the values of active channels in the document, which in this case are CMYK channels. You start out with the Cyan channel and notice that the Cyan channel is currently at 100%. This 100% number represents the current Cyan reading we have, which was 87% in my example (I saw it just before I switched the Info panel to Total Ink).
3. Lower the 100% number down to about 95%. This will take out 5% out of the Cyan number we had before, in this case 5% of 87 which equals 4.35%. So our original 87% reading will have dropped to 82.65%.

4. Click the Output Channel option from the Channel Mixer panel and change from the Cyan channel to the Magenta channel. Here, do the exact same thing and lower the number to 95%.
5. Now switch to the Yellow channel and lower this one to 95% too. We’re not switching to the black channel because there is more dark information in the image being produced by mixing Cyan + Magenta + Yellow than there is in the Black channel. So leave this one alone.
6. Look at your Info panel and notice that the number next to the / character shows a different value. This number represents the “after” version of your adjustment. Notice that this number is lower than the original? Th
at is the effect of our change.

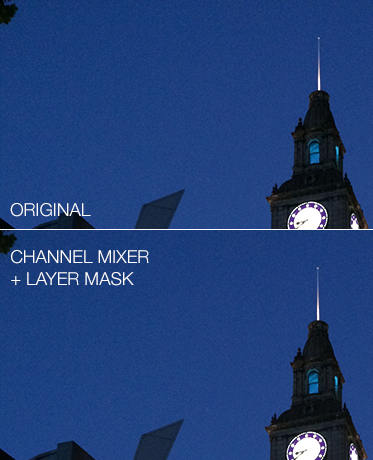
7. Click the eye icon next to the Channel Mixer layer to see the before and after versions of your image. Notice that the image is actually brightening up slightly? That’s something we need to avoid. But don’t worry, we’ll fix that up in the next step. (There’s a chance the brighter version is not that clear here, but it will surely be visible in Photoshop).

Step four: limit the change to the darkest areas
This next (and final) step is needed to hide our adjustment and change it from a global change to a local change.
1. Open up the Channels panel (Window > Channels) and hover your cursor over the Black channel.
2. Hold down the CTRL / CMD key on the keyboard to change the cursor icon to a selection cursor.

3. Now click to load your black channel as a selection. Now you have selected the actual shadow areas of your image and we’ll use this selection to limit the effect of our Channel Mixer

4. Click the white mask thumbnail of your Channel Mixer layer and fill this with black by choosing Edit > Fill. Choose Black from the Use drop down in the dialog box that follows and click OK.
5. Deselect your selection by using the CTRL+D or CMD+D shortcut. Now you’ll see that you have the inverted selection as a layer mask fill where the shadow areas in your areas are painted white and the other portions are black. This means that our adjustment will only be applied to the shadow areas of the image and nowhere else.

6. (Optional) The original Black channel we used before isn’t perfect in every image, meaning that it might be a little bit to “generous” and still mark certain areas in your image as “shadow” while they are actually not. To limit the effect of your adjustment layer even more, select the mask by clicking its thumbnail and choose the Curves command via Image > Adjustments > Curves. Increase the contrast of your mask by moving the points closer together.

Tip: remember you can always see your mask in full screen by ALT / OPT clicking on the mask thumbnail first.
When you click the Channel Mixer eye icon to make a before / after comparison you’ll notice that the image hardly changes visually but you still have a noticeable difference in your Info panel. And if needed you can always lower the individual channels a bit more to make this effect stronger, or you can duplicate your adjustment layer.
Read more
- Adobe Illustrator & Photoshop tutorial: Create a low-poly portrait
- How to Create Brilliant Light Streaks in Photoshop
- Guide to Halftone Pattern
- Advanced Colorization Technique
- Design amazing mosaic effects
- How To Fake a Tilt-Shift Photo
- Emphasize or Hide Skin Flaws With One Layer
- Compositing with Adjustment layers
- Simple Roy Lichtenstein Style in Illustrator and Photoshop
- How To Create A Vibrant Image Using Photoshop
- Photoshop Keyboard Shortcuts
- New Photoshop Workspace
Source: creativepro.com
Σχόλια
Δημοσίευση σχολίου