

This tutorial shows how to create a cool look using Illustrator’s Symbols and Global Colors. But what if you want total control over your mosaics’ appearance, and the ability to update it at the click of a button?
It’s not as tricky as it sounds. This tutorial will guide you through the process of creating a more stylized mosaic that uses smaller, vector shapes rather than images to make up the final piece.
To start off, you’ll be using Photoshop’s Mosaic filter to create your own image-based swatch library. You’ll then harness Illustrator’s powerful Global Color and Symbol features, and discover just how simple it is to update your artwork on the fly. This has the bonus of creating artworks with manageable file sizes.

Step: 3
Now go to Mode > Indexed Color, set the number of colours to 50 and hit OK. Then select Image > Mode > Color Table to preview the palette based on the image. Now save the library.
This is a much quicker method than using the Eyedropper tool to select individual colours and adding them one by one to the Swatches palette – it also works with any RGB image.

Step: 4
In your Swatches palette, use the fly-out menu to select Replace Swatches, and then navigate to your saved library. With the new swatches loaded, choose Save Swatches for Exchange and name them.
You’ll be using Illustrator to complete this tutorial, and exchange swatches are compatible. Close the file, but don’t save it.

Step: 5
Launch Illustrator and open the Preferences panel (Illustrator > Preferences). Set the General Units to pixels, then under Grids & Guides, set a gridline every 12 pixels, with a subdivision of 1.
Also enable Snap To Grid in the View menu. Now ensure that the rules are visible (R), then zoom in and drag and snap the rule origin point to the top right of the artboard.
Next, create a new landscape RGB document measuring 888-x-650 pixels and go File > Place to place your filtered image. Snap it centrally and lock the layer.

Step: 6
Clear your existing swatches by using the fly-out menu and choosing Select All Unused, then drag them to the bin icon. Now load your exchange swatches by selecting Open Swatch Library, choosing Other Library, then navigate to their location (alternatively, loadMosaic_swatches. ai from the project files).
Shift + click the top and bottom thumbnail in the new palette and use the fly-out menu to add them to your Swatches. Your swatches are now Global – this gives you an enhanced workflow.

Step: 7
Temporarily disable the visibility of the placed image, then add a new layer to make your shapes. Use the Rectangle and Rounded Rectangle tools to draw a selection of square abstract designs. Use your swatches to add colour, remembering that you need some for the background, hair and face.
Also, create a series of Radial Gradients and apply them to other shapes. Select each shape in turn and add them to the Symbol library by clicking on the Place Instance icon in the Symbols palette. Aternatively, load Mosaic_ symbols.ai from the project files.

Step: 8
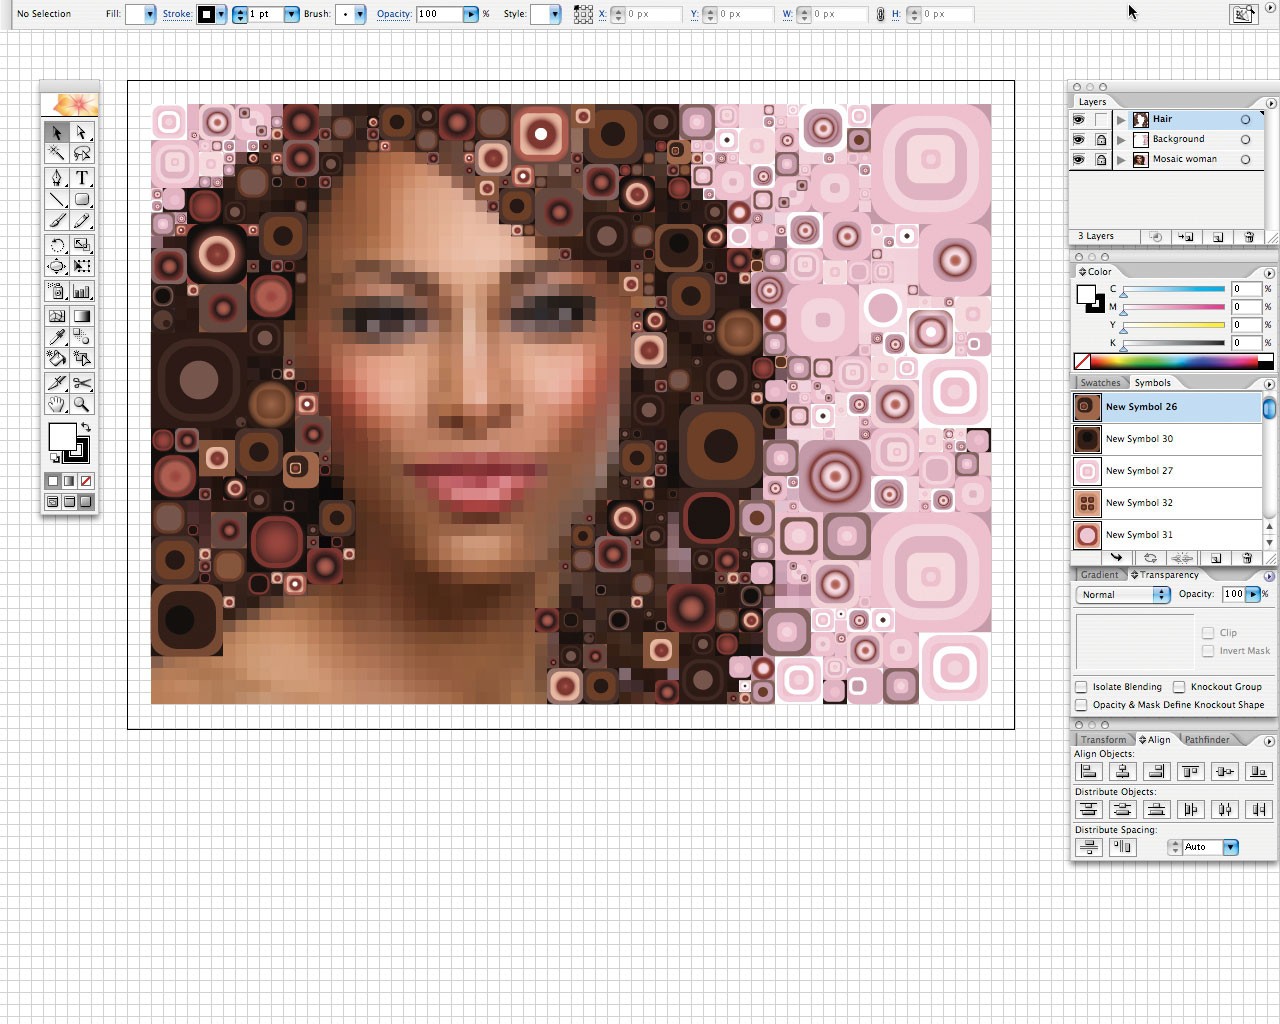
Add a new layer above the placed image and label it ‘Background’. Now start adding your symbols by dragging their thumbnails onto the artboard.
Use the grid, re-size and snap them into position – select shapes that match the underlying colour for best results. Vary their size and rotate and flip them as you work to avoid repetition.

Step: 9
Add another layer above the skin and label it ‘Hair’. Follow the same techniques to block in the girl’s hair, using symbols with similar colour values.
Also, try leaving some small gaps, so the pixellation from the placed image shows through.

Step: 10
Add another layer at the top of the stack and label it ‘Skin’. You’ll need some patience here: because of the facial features, placing symbols randomly will look awful.
Choose your skin symbols carefully – generally ones with less contrast and detail work well. Use smaller, more detailed symbols for the eyes, nostrils and lips.
It’s helpful to disable the visibility of the original image from time to time, as in the inset.

Step: 11
Continue building up the facial shapes. Squint a little and step back from your screen occasionally to check your progress. This does take trial and error, but the finished result will be worth the effort.

Step: 12
Unlock all layers except the placed image, and then scrutinize the image carefully to see if there are any areas that need improvement.
You can also adjust your global swatches by double-clicking their thumbnails to make any necessary modifications – after accepting the changes, you’ll notice all the swatch-coloured objects in your illustration update automatically.

Step: 13
The great thing about using symbol instances, apart from greatly reducing Illustrator’s file sizes, is they can be globally modified too.
To do this, drag a symbol onto the artboard, then click the Break Link icon in the Symbols palette and modify it (I used the Bloat tool), then use the pop-out menu in the symbols palette to select Redefine Symbol. Now every occurrence of that symbol is updated.

Step: 14
Now target your ‘Background’ layer and check the button next to the layer thumbnail to select all the layer content. Now set the blending mode to Hard Light.
Repeat this on the ‘Hair’ and ‘Skin Layer’ and you’re done. If you want to make your illustration fully vector-based, you could always perform a Live Trace on the placed image.
It’s not as tricky as it sounds. This tutorial will guide you through the process of creating a more stylized mosaic that uses smaller, vector shapes rather than images to make up the final piece.
To start off, you’ll be using Photoshop’s Mosaic filter to create your own image-based swatch library. You’ll then harness Illustrator’s powerful Global Color and Symbol features, and discover just how simple it is to update your artwork on the fly. This has the bonus of creating artworks with manageable file sizes.
Time to complete 2.5 hours

In Photoshop, create a new RGB landscape canvas at 300dpi, measuring 3,500-x-2,500 pixels. Next, download the image of the girl from iStockPhoto for a small cost from http://tinyurl.com/7vfmwt.
Alternatively, feel free to use your own image, but bear in mind the final effect works best on close-up shots. Drag it into your canvas, flip it horizontally and transform it to fit.

Step: 2
Hit Cmd/Ctrl + E to Merge Down, then selectFilter > Pixelate > Mosaic, and in the next dialog box enter a Cell Size of 50.
Save the file to a convenient and memorable location.

Step: 3
Now go to Mode > Indexed Color, set the number of colours to 50 and hit OK. Then select Image > Mode > Color Table to preview the palette based on the image. Now save the library.
This is a much quicker method than using the Eyedropper tool to select individual colours and adding them one by one to the Swatches palette – it also works with any RGB image.

Step: 4
In your Swatches palette, use the fly-out menu to select Replace Swatches, and then navigate to your saved library. With the new swatches loaded, choose Save Swatches for Exchange and name them.
You’ll be using Illustrator to complete this tutorial, and exchange swatches are compatible. Close the file, but don’t save it.

Step: 5
Launch Illustrator and open the Preferences panel (Illustrator > Preferences). Set the General Units to pixels, then under Grids & Guides, set a gridline every 12 pixels, with a subdivision of 1.
Also enable Snap To Grid in the View menu. Now ensure that the rules are visible (R), then zoom in and drag and snap the rule origin point to the top right of the artboard.
Next, create a new landscape RGB document measuring 888-x-650 pixels and go File > Place to place your filtered image. Snap it centrally and lock the layer.

Step: 6
Clear your existing swatches by using the fly-out menu and choosing Select All Unused, then drag them to the bin icon. Now load your exchange swatches by selecting Open Swatch Library, choosing Other Library, then navigate to their location (alternatively, loadMosaic_swatches. ai from the project files).
Shift + click the top and bottom thumbnail in the new palette and use the fly-out menu to add them to your Swatches. Your swatches are now Global – this gives you an enhanced workflow.

Step: 7
Temporarily disable the visibility of the placed image, then add a new layer to make your shapes. Use the Rectangle and Rounded Rectangle tools to draw a selection of square abstract designs. Use your swatches to add colour, remembering that you need some for the background, hair and face.
Also, create a series of Radial Gradients and apply them to other shapes. Select each shape in turn and add them to the Symbol library by clicking on the Place Instance icon in the Symbols palette. Aternatively, load Mosaic_ symbols.ai from the project files.

Step: 8
Add a new layer above the placed image and label it ‘Background’. Now start adding your symbols by dragging their thumbnails onto the artboard.
Use the grid, re-size and snap them into position – select shapes that match the underlying colour for best results. Vary their size and rotate and flip them as you work to avoid repetition.

Step: 9
Add another layer above the skin and label it ‘Hair’. Follow the same techniques to block in the girl’s hair, using symbols with similar colour values.
Also, try leaving some small gaps, so the pixellation from the placed image shows through.
Step: 10
Add another layer at the top of the stack and label it ‘Skin’. You’ll need some patience here: because of the facial features, placing symbols randomly will look awful.
Choose your skin symbols carefully – generally ones with less contrast and detail work well. Use smaller, more detailed symbols for the eyes, nostrils and lips.
It’s helpful to disable the visibility of the original image from time to time, as in the inset.

Step: 11
Continue building up the facial shapes. Squint a little and step back from your screen occasionally to check your progress. This does take trial and error, but the finished result will be worth the effort.

Step: 12
Unlock all layers except the placed image, and then scrutinize the image carefully to see if there are any areas that need improvement.
You can also adjust your global swatches by double-clicking their thumbnails to make any necessary modifications – after accepting the changes, you’ll notice all the swatch-coloured objects in your illustration update automatically.

Step: 13
The great thing about using symbol instances, apart from greatly reducing Illustrator’s file sizes, is they can be globally modified too.
To do this, drag a symbol onto the artboard, then click the Break Link icon in the Symbols palette and modify it (I used the Bloat tool), then use the pop-out menu in the symbols palette to select Redefine Symbol. Now every occurrence of that symbol is updated.

Step: 14
Now target your ‘Background’ layer and check the button next to the layer thumbnail to select all the layer content. Now set the blending mode to Hard Light.
Repeat this on the ‘Hair’ and ‘Skin Layer’ and you’re done. If you want to make your illustration fully vector-based, you could always perform a Live Trace on the placed image.

Σχόλια
Δημοσίευση σχολίου