by Graf Kaberne
In this Illustrator tutorial, you are going to learn how to draw a beautiful vector cosmetic product illustration. It is pretty easy and beginners can learn the basics of coloring and drawing. At the end, we are going to add some glitters to finish it. So let’s get started with drawing vector bottles!
Drawing the Cosmetic Bottle
1. First, create a new document and using the Rectangle Tool (M) and draw a rectangle with the following sizes: Width: 180 px, Height: 150 px.
2. Pick the Ellipse Tool (L) and create an ellipse with size: Width: 180px, Height: 80 px. Position it as in the picture shown bellow. After that, edit the bottom key point in the ellipse, following the example from the picture:
3. Click Ctrl+C, followed by Ctrl+F to copy the ellipse. Flip the copy vertical and position it in the top end of the rectangle. Now, select the two ellipses together with the rectangle and open the panel Pathfinder. In the panel, click on Add to Shape.
4. Let’s learn to draw the cap. Create a rectangle with sizes width: 100px, Height 80px and click Effect>Stilize>Round Corner with radius 10px. After that go in Object>Expand appearance. Create another rectangle and position it over the one with the rounded corners like shown on the picture bellow. Open the Pathfinder panel and click on the Minus front.
5. Now, we are going to fill the shapes with color. Select the bigger shape and open the Gradient panel. Choose Linear type. Add 4 more gradient stops. For the first stop, choose a colour R:219 G:217 B:210, Location 0%. For the second one – R:255 G:255 B:255 Location 20%, and for the third one – R:234 G:232 B:230, Location 40%, for the forth – R:234 G:232 B:230, Location 60%, for the fifth – R:255 G:255 B:255, Location 85% and for the last one – R:219 G:217 B:210 Location 100%.
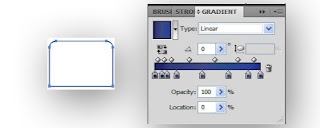
6. Select the bottle cap and open the Gradient panel. We are going to make 8 gradient stops as shown below. Fig 1 is the left most stop and fig 8 the right most stop.

Drawing the Label
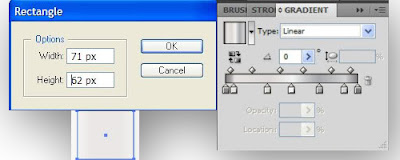
7. Select the Rectangle Tool (M) and create a rectangle with sizes Width: 71px, Height: 62px and fill it with Linear gradient. To do so open the panel Gradient and create 7 Sto colour sliders. For the first one from left to the right select colour R:139 G:135 B:142, for the second one R:229 G:226 B:223, for the third one R:222 G:217 B:214, for the forth one R:243 G:244 B:244, for the fifth one R:167 G:169 B:172, fpr the sixth one R:209 G:211 B:212 and for the last one R:128 G:123 B:128. Position this rectangle in the centre and a little bit upwards from the original shape.

8. Copy the rectangle you’ve just created by clicking Ctrl+C, followed by Ctrl+F. Select the Free Transform Tool (E) and decrease the size of the copy a little bit from the top and a little bit from the bottom.
9. Having the new created shape still selected, fill it with Linear Gradient. Open the panel Gradient with settings: Linear, 3 Colour Stop sliders. For the first select colour R:23 G:36 B:145, Location 0%, for the second one R:27 G:50 B:164 Location 45%, and for the third one R:26 G:59 B:173 Location 100%.
10. Now let’s add text on the last created shape. Select the Type Tool (T) and type “NIVEA” with White colour. I used the Eras bold font with size 18pt.
11. Add the remaining text you need. Type “FOR” under “NIVEA”. I used Corbel font size 7pt. For “Men” I used FreeStyle Script font size 35pt and filled it with Linear gradient with colours from white to grey. For the text “ESSENTIELLE PFLEGE” I used the Calibri Bold font size 9pt, dark blue colour. For the text “CARE PRO” i used Eras light font, size 7pt, dark blue colour. For the text “AFTER SHAVE” I used Arial font, size 10pt, and for “MILDER BALSAM” I used Myriad Pro font, size 12pt. For “Regeneriert & pflegt” I used Arial Regular font, size 8pt. For the text “Full normale bis troskene Haut”, I used Arial font, size 7pt, white colour. I added dark blue rectangle under this text as shown below.
12. Select the Pen Tool and create the shape shown on the picture bellow, fill it up with this colour R:204 G:204 B:204 and decrease the opacity to 35%, copy the shape using Ctrl+c, followed by Ctrl+F, flip it horizontal and position it on the other side of the bottle.
13. Create a shape using the Pen tool like the one shown bellow, fill it with grey colour, move it under the lid of the bottle, then go to Effect>Blur>Gaussian blur, apply radius 5px and click Ok and straight after that go to Effect>Stilize>Feather and select Feather radius 18px, click Ok, decrease Opacity to 60%. Copy the main shape of the vial and position it over the shape you’ve just created, select the copy of the bottle and the shape that you just applied Blur and Feather to and go on Object>Clipping Mask>Make.
14. Using the Pencil tool and draw lines like the ones shown below. With the shapes selected, go to Windows>Brush libraries>Artistic>Artistic ink and select the shape shown below and select white colour as a Stroke color. Copy the shape, move it a little bit on the right and down, copy it one more time, flip it horizontaly and move it on the other side of the bottle.
15. Create more small shapes like the ones shown below and fill them with grey colo. Change the Blend mode from Normal to Multiply and decrease the Opacity to 70%.
16. Select the Ellipse tool and create a circle with Width: 5px Height: 5x. Fill it with white colour, duplicate the circle, move it a bit on the right like shown below. Select the two circles and go to Object Blend>Blend options in the window. Select 15 for Specified Steps and click Ok. Next, go to Object>Expand.
17. As the circles are still selected go to Object>Envelope Distort and make with warp and make the following settings: Bend – 15, Horizontal and click Ok. Move the circles under all other shapes by going to Object> Arrang>Send to back and position them as shown below.
Background and Special Effects
18. Now it’s time to add the shadow for the bottle. Select the ellipse tool and create an ellipse with sizes Width: 375px height: 28px. fill the ellipse with Radial gradient colours black to white, then go to Effect>Blur>Gaussian blur and select raduis 5-6px. Click Ok, move the ellipse under all other shapes of the bottle and change the Blend mode from Normal to Multiply. Decrease the Opacity to 61%.
Next, we will crete the background. Select the Rectangle tool and create a rectangle with sizes Width: 420px Height: 500px. Now go to Effect>Stylize Round Corners, in the opened window select raduis 30px and click Ok. Fill the rectangle with Radial gradient and colours from white to dark blue. Move the rectangle behind all other shapes by going to Object>Arrange>Send to back.
19. You can also add stars too. To make them create a circle with sizes 31-31px and fill it with white colour. As the circle is still selected, go to Effect>Discort & transform pucker & bloat, in the window which is going to open select pucker -80% and click Ok.
20. Create another circle, position it in the center of the star you’ve created and go to Effect>Blur>Gaussian blur. Select radius 5.6px and click Ok. Copy the star a couple of times and resize it to different sizes, opacity and positions. With all this done, we are have completed an interesting product illustration in Illustrator.
Drawing the Cosmetic Bottle
1. First, create a new document and using the Rectangle Tool (M) and draw a rectangle with the following sizes: Width: 180 px, Height: 150 px.
2. Pick the Ellipse Tool (L) and create an ellipse with size: Width: 180px, Height: 80 px. Position it as in the picture shown bellow. After that, edit the bottom key point in the ellipse, following the example from the picture:
4. Let’s learn to draw the cap. Create a rectangle with sizes width: 100px, Height 80px and click Effect>Stilize>Round Corner with radius 10px. After that go in Object>Expand appearance. Create another rectangle and position it over the one with the rounded corners like shown on the picture bellow. Open the Pathfinder panel and click on the Minus front.
5. Now, we are going to fill the shapes with color. Select the bigger shape and open the Gradient panel. Choose Linear type. Add 4 more gradient stops. For the first stop, choose a colour R:219 G:217 B:210, Location 0%. For the second one – R:255 G:255 B:255 Location 20%, and for the third one – R:234 G:232 B:230, Location 40%, for the forth – R:234 G:232 B:230, Location 60%, for the fifth – R:255 G:255 B:255, Location 85% and for the last one – R:219 G:217 B:210 Location 100%.
6. Select the bottle cap and open the Gradient panel. We are going to make 8 gradient stops as shown below. Fig 1 is the left most stop and fig 8 the right most stop.

The main part of the bottle is ready.
7. Select the Rectangle Tool (M) and create a rectangle with sizes Width: 71px, Height: 62px and fill it with Linear gradient. To do so open the panel Gradient and create 7 Sto colour sliders. For the first one from left to the right select colour R:139 G:135 B:142, for the second one R:229 G:226 B:223, for the third one R:222 G:217 B:214, for the forth one R:243 G:244 B:244, for the fifth one R:167 G:169 B:172, fpr the sixth one R:209 G:211 B:212 and for the last one R:128 G:123 B:128. Position this rectangle in the centre and a little bit upwards from the original shape.

9. Having the new created shape still selected, fill it with Linear Gradient. Open the panel Gradient with settings: Linear, 3 Colour Stop sliders. For the first select colour R:23 G:36 B:145, Location 0%, for the second one R:27 G:50 B:164 Location 45%, and for the third one R:26 G:59 B:173 Location 100%.
11. Add the remaining text you need. Type “FOR” under “NIVEA”. I used Corbel font size 7pt. For “Men” I used FreeStyle Script font size 35pt and filled it with Linear gradient with colours from white to grey. For the text “ESSENTIELLE PFLEGE” I used the Calibri Bold font size 9pt, dark blue colour. For the text “CARE PRO” i used Eras light font, size 7pt, dark blue colour. For the text “AFTER SHAVE” I used Arial font, size 10pt, and for “MILDER BALSAM” I used Myriad Pro font, size 12pt. For “Regeneriert & pflegt” I used Arial Regular font, size 8pt. For the text “Full normale bis troskene Haut”, I used Arial font, size 7pt, white colour. I added dark blue rectangle under this text as shown below.
12. Select the Pen Tool and create the shape shown on the picture bellow, fill it up with this colour R:204 G:204 B:204 and decrease the opacity to 35%, copy the shape using Ctrl+c, followed by Ctrl+F, flip it horizontal and position it on the other side of the bottle.
13. Create a shape using the Pen tool like the one shown bellow, fill it with grey colour, move it under the lid of the bottle, then go to Effect>Blur>Gaussian blur, apply radius 5px and click Ok and straight after that go to Effect>Stilize>Feather and select Feather radius 18px, click Ok, decrease Opacity to 60%. Copy the main shape of the vial and position it over the shape you’ve just created, select the copy of the bottle and the shape that you just applied Blur and Feather to and go on Object>Clipping Mask>Make.
14. Using the Pencil tool and draw lines like the ones shown below. With the shapes selected, go to Windows>Brush libraries>Artistic>Artistic ink and select the shape shown below and select white colour as a Stroke color. Copy the shape, move it a little bit on the right and down, copy it one more time, flip it horizontaly and move it on the other side of the bottle.
15. Create more small shapes like the ones shown below and fill them with grey colo. Change the Blend mode from Normal to Multiply and decrease the Opacity to 70%.
16. Select the Ellipse tool and create a circle with Width: 5px Height: 5x. Fill it with white colour, duplicate the circle, move it a bit on the right like shown below. Select the two circles and go to Object Blend>Blend options in the window. Select 15 for Specified Steps and click Ok. Next, go to Object>Expand.
17. As the circles are still selected go to Object>Envelope Distort and make with warp and make the following settings: Bend – 15, Horizontal and click Ok. Move the circles under all other shapes by going to Object> Arrang>Send to back and position them as shown below.
Background and Special Effects
18. Now it’s time to add the shadow for the bottle. Select the ellipse tool and create an ellipse with sizes Width: 375px height: 28px. fill the ellipse with Radial gradient colours black to white, then go to Effect>Blur>Gaussian blur and select raduis 5-6px. Click Ok, move the ellipse under all other shapes of the bottle and change the Blend mode from Normal to Multiply. Decrease the Opacity to 61%.
Next, we will crete the background. Select the Rectangle tool and create a rectangle with sizes Width: 420px Height: 500px. Now go to Effect>Stylize Round Corners, in the opened window select raduis 30px and click Ok. Fill the rectangle with Radial gradient and colours from white to dark blue. Move the rectangle behind all other shapes by going to Object>Arrange>Send to back.
20. Create another circle, position it in the center of the star you’ve created and go to Effect>Blur>Gaussian blur. Select radius 5.6px and click Ok. Copy the star a couple of times and resize it to different sizes, opacity and positions. With all this done, we are have completed an interesting product illustration in Illustrator.
Here is the completed design.
(This product is owned by Nivea. This illustration is reproduced for educational purposes only.)
Source
(This product is owned by Nivea. This illustration is reproduced for educational purposes only.)
Source
See also
- Gradient Reflection & Glossy Surface
- Create an Aged Vintage Style Logo Design
- How To Create a Classic Vector Style Tattoo


Wow that's amazing...
ΑπάντησηΔιαγραφήThe bottles above looks elegant and also big too.
Maybe you want some cosmetic bottles of smaller size and what do you think this
Try this lotion bottle and let it make your travel convenient than before