Lighting effects
have become quite popular, and are an effective way to add bright eye catching
details to a photo or illustration. In this tutorial, you will learn a simple
technique for creating brilliant light streaks which can be used in different
ways to add motion and brightness to your designs.
Step 1
First, lets create a nice background for our effect. Open up a new
Photoshop file, and fill the background with black. Now, create a new layer and
fill it with white. We will use the Lighting Effects filter (Filters >
Render > Lighting Effects) on this layer to create a nice soft gradient. Next
to the Intensity slider, choose any color that you like as long as it is
somewhat dark. For this example, I have chosen a dark pink/purple.
Step 2
Now lets create a light from which all of our streaks will be created. Start
by creating a new layer and setting it’s blend mode to screen. Then use the
Elliptical Marquee Tool to make a circular selection and Feather(Select >
Modify > Feather) it with a value of 20 pixels. This will give our light a
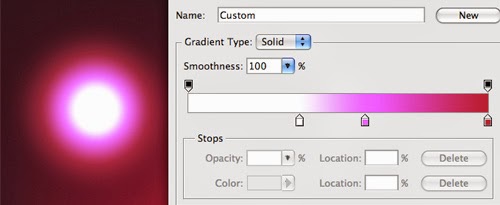
nice glow around the edges. Using the Radial Gradient Fill tool, we are going
to give it some color and intensity. I like to use 3 colors for the gradient.
The first and inner most color should be white or something close to it. Make
sure to start the fill in the middle of your selection and end it a the edge.

Step 3
Make a copy of the light layer that we just created, and hide the
original. You will need it later to make additional streaks. Now, lets
scale(Edit > Transform > Scale) the light so that it is much flatter. Doing
this allows you to control the thickness of your streak.
Step 4
Now we get to start having fun. To give our light that streak look there
are two filters we can use: Wave(Filter > Distort > Wave) and
Twirl(Filter > Distort > Twirl). By using Wave, you can achieve some very
nice looking irregular paths for your light. Like any other filter with
sliders, it takes some tweaking to achieve the result you are after, but you
will probably need to up the wave length and amplitude considerably. Also, try
applying the Wave filter multiple times to the same layer.
The Twirl filter will give you a streak that is moving in a more radial
type of path.
Also, don’t be afraid to combine the two. By doing so you will be adding
more detail to each streak, and making the overall effect more interesting.
See also- Guide to Halftone Pattern
- Advanced Colorization Technique
- Design amazing mosaic effects
- How To Fake a Tilt-Shift Photo
- Emphasize or Hide Skin Flaws With One Layer
- Compositing with Adjustment layers
- Simple Roy Lichtenstein Style in Illustrator and Photoshop
- How To Create A Vibrant Image Using Photoshop
- Photoshop Keyboard Shortcuts
- New Photoshop Workspace
Source
designreviver


Σχόλια
Δημοσίευση σχολίου